Showing posts with label vintage. Show all posts

Sunday, 12 July 2015

Birthday treats

So since I last posted I've had a birthday. They definitely come quicker as you get older. It was a nice day the sun was out, I went for a meal and then watched a film. Also the postman called with an Ebay purchase. A vintage cantilever seeing box. I have been after one if these since I saw my friends and sadly the lid had fallen off my old sewing box. I love it even its history a present from the kids.


So I sat in the morning sun and sorted the box out. Decided I needed a new pincushion as the one I used wouldnt fit in the box.  Years ago my daughter made me a pin cushion at school it was made from a plastic milk bottle  top.  It had stuffed fabric on the top and a hair elastic to fit on the wrist something like these


I found it incredibly useful it wasn't heavy on the wrist. In time the hair band stretched but also the plastic cap base wasn't quite wide enough for all the pins, sometime I would miss and catch my skin. so I thought I would make one but modify it.
So I found a wide plastic bottle top, mine was from a hot chocolate container about 2 1/2" wide and went from there.
The tape around the side is bias which I glued.
I densly stuffed a ball shape with unwashed sheep wool (which I'd read is good for the pins) using a cotton sheeting.
I then laid an old cashmere jumper over top. I wanted to use natural fibres throughout.  To anchor  it all down so it was compressed and so I could sew it to the tape I wound cotton around the whole thing, imagine winding a ball of wool. Then I could stitch it without any pins in, then  cut away the cotton when finished.
The strap was some velvet like furnishing braid which I glued  to the base then covered the base and anchoring the straps with sitches. Press stud to finish


To finish off isn't this a delightful giftbag from my daughter I love it and want to use it, too nice to be thrown away, but dont know how. Any ideas?

Thursday, 9 July 2015

A rucksack for Amy

I was fortunate to be given some old curtains, vintage as well. My daughters friend fell in love with some William Morris ones and somehow I offered to make a rucksack for her for when she goes to university. We drafted up some ideas. I had some leather samples, just liitle squares so she asked if I could make pockets with them one blue one green  a zipped pocket on the back for security and an inner zipped pocket.


I must admit it  came together like a breeze. It was so good not to use a pattern and let my creative juices flow. I didn't want to put it down I was engrossed.

 I wish I get more creative with my dressmsking. You know embroidering, appliqué even patchworking pieces before cutting out. I once saw a lady who had a marvellous pea coat and each piece was a different fabric they were like curtain fabrics. It was inspiring, crazy and fun all at once.

  I made a shoulder strap  and interlined it for comfort and more support. I only needed to purchase the straps and fasteners. Everything else was available which was great.


As you can imagine she is delighted with it.


Saturday, 9 November 2013

vintage sewing and craft books


Blogging so inspires me.  After reading a post earlier in the day it prompted me to get a couple of books of my shelf and familirise its contents.  

These books are wonderful I love them a great insight into sewing in the 1940's when times were hard, money and supplies sparse and rationed but imagination was unlimited. I just had to share them with you.


 Isnt the inner cover a lovely design, ingeneous.  Once inside the books there are endless patterns and ideas.  Articles on darning and repairing.  Getting wear out of wool jackets by unpicking the whole outfit and turning in inside out for more wear, have you ever heard of anything so bizzare, and even 1940's
recycling


My favourite parts are where they decorate their plain materials to create something unique using simple ribbons, and rick rack.
love the top left trim made from ribbon.


Just look at this collar made from rick rack braid, wouldnt it look lovely on a simple shift dress, and even plain covered button get a makeover.


Here is a 1940's onesie, they called them cleaning overalls, very much like our "onesies" which were selling like hotcakes today in the shops when Christmas shopping. I do hope you liked these books as much as I do. 
Image and video hosting by TinyPic

Thursday, 7 June 2012

A Vintage Day

Whilst out in the garden the other day, my son called "You do know there are vintage cars going through the village" I quickly dropped everything I was doing and dashed out to the front of the house. This time with my camera ready for action.

One of the plus sides of living on a main village road is 3 or 4 times a year we have vintage cars, or motor cycles pass by our home. Now anyone who follows me or drops by my blog will know I LOVE VINTAGE.


Here they come!!


 A Rolls Royce


For old bangers they were whizzing past at an alarming rate


I love the contrast between new and old open top cars here


They were waving away

Such fun I love them.

Later a stint at the local charity shop where I volunteer, then a walk to the main shops always has its rewards. Today I bought home .
This delightful leather suitcase (sadly with different fasteners) for the pricely sum of £2.00
Battered but a bargain.
and these pocket opera glasses with complete packaging £3.00.  Which I think are very quirky. No idea what I shall do with them.  Hubbie said "I hope this doesnt mean you want to go to an opera"
and this is our little vintage car (not ours) on our wedding day, it was one of the highlights for us both.


Image and video hosting by TinyPic


Thursday, 26 April 2012

Blooming Weather!.. Ideal for a spot of sewing

An April shower wont last half an hour.  Well Im not to sure about that one.   It has rained, now for about a week with just the odd hour of sunshine. 

at least the water isnt coming up onto the pavements, since we had the new pumping system put in, no more episodes like  this  (touch wood)


Even the cat doesn't want to go outside.
I'm waiting patiently to plant these potatoes, that have been on the  sill for what seems an eternity.
The tulips are looking nice though.  So whilst the weather  stops me from finishing sorting the garden out,  I continue to sew. 

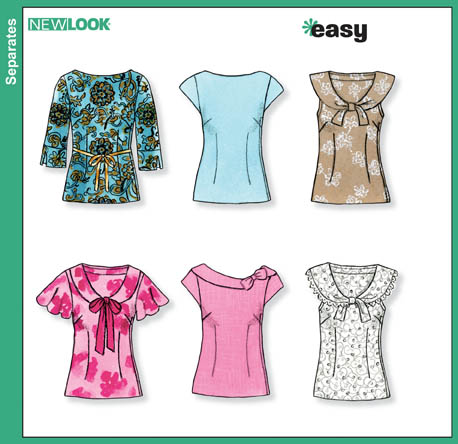
Ive discovered the trick is to have a cutting out session.  So the other week I cut out three items to sew. I shall show you the first one today.  I had seen this pattern on another blog   


Photo
New Look 6808

I realised I had something similar in this Vogue pattern. I thought I could recreate  the above from this and add a collar.


Photo
Vogue 8667
Id made this pattern previously  but wasnt happy with the princess sea, it was way too high for me. So with the help of a friend I redrafted the top changing the princess seam into a vertical seamst seam.  Then I just added a collar, self drafted.


Isnt this fabric Soo beautiful. 
A petrol blue with large blossoms, I love it.  Its  36" wide seersucker, vintage and incredibly light.   I had just over a metre. Just enough to make a sleeveless top, I had to use bias on the seams binding and a contrast material under the collar.


How do you all take photos of yourselves I found it impossible, especially in my tiny cottage


At last with the help of someone, a really quick and easy top with so many options.


Sunday, 11 December 2011

Vintage Lampshade Tutorial

Since painting all the downstairs white.  I am not so sure about the results.   
"It looks like an IKEA showroom" said one.
"Im sure when you get your pictures up it will look better"
The pictures were up, so I thought a change of colour of my light shades might inject some much needed colour.
Ive had this idea in my head for sometime. Using a vintage embroidered tablecloth that has been sitting in my linen storage.
Here is my 1st tutorial
Vintage Lampshade Cover Tutorial

Materials

1  vintage embroidered tablecloth or similar material with embroidery.
1 lampshade
Pins
Needle and cotton (sewing machine optional)
Large piece of cotton material to make template

A tablecloth or old linen with embroidery on.  This one cost me £2.00, hence me not being able to resist buying it. 


If you have carefully unpicked the original cover to use as a template, the next bit wont apply to you.
Getting your spare piece of cotton and using it on the bias, lay it over one half of the shade, pulling and pinning the piece until smooth. Pin the top, bottom and sides as shown of one half, and mark with a pen the frame edges at top, bottom and the vertical struts.

Unpin, layout and cut out the pattern shape, remembering to add seam allowances.
You now have your pattern piece, being one half of your shade.
keep scrolling down having trouble posting here
<><><><><>

Your now need to plan how your material is going to fit on your pattern piece.  In my case I want to use this corner pattern, so this would mean adding extra piece to the sides.
Cut out 2 pieces
This was how I made my pieces.  Stitch the material pieces together, machine or hand stitch
 N.B. if hand-stitching make sure you make small stitches as later on the piece of material will be stretched and if the stitches arent close enough the could gape. 
After joining pieces if necessary, press. 
Next put the 2 halves right sides together and tack. 

Turn though and try on the shade

Take note of any necessary alterations e.g. whether it is either too tight or  baggy.
Adjust seams if necessary then machine.
Turn though and press seams open. If not lining the shade finish off all seam edges.

 Now you are ready to attach the cover to your shade.

First make sure your two vertical seams are straight. Try and aline them with the struts.   Then make sure that each piece is centred. Slowly pull the material over the top and bottom of the shade and pin to secure. Make sure the cover is as  tight as a drum. 
be careful with the pins. try and face then inwards so you do catch yourself on them.    

Take a needle with a good thread, to avoid the thread snapping as you tug.  And stitch the cover to the shade with small stabbing stitches.  If you intend to put trimmings on the top and bottoms, it wont matter too much how neat your stitching is.


It looks really striking in the evening.


  Dont you think.
A quirky original vintage cover.  I think I will put some bobble fringing on  the bottom just to finish it off.
I hope you like it.

little update here.  Thought I would add the wall lights that I covered. Here I used  the centre pieces of the tablecloth.
Image and video hosting by TinyPic